Each time you start MS-SQL Server, the DBMS creates a special database named TempDB. The server uses the TempDB database for such things as temporary tables, cursor data, and temporary, user-created global variables. In short, the TempDB database is the system's scratchpad. However, you can use it as well.
The advantage of using TempDB is that activities you perform to TempDB objects (tables, views, indexes, and so on) are not logged. As such, the DBMS can manipulate data in TempDB faster than it does in other databases.
Prior to changing database objects and data values (other than TempDB objects and data), the DBMS must store the preupdate (original) object structures and values in the transaction log. Thus, for non-TempDB data, every data manipulation involves two save operations— save the original and then save the updated value. Saving the original data values can impose significant overhead if you are making a large number of changes. When using TempDB objects, however, the DBMS has to perform storage operations only once—to save the updated values to disk.
The downside of using TempDB objects is that you cannot roll back (or undo) manipulations made on TempDB objects. Moreover, each time you shut down the DBMS and restart it, TempDB (and all of its objects) is erased. As such, any information stored in TempDB is lost each time the DBMS restarts (and re-creates TempDB). Therefore, do not rely on the existence of any information in TempDB from one session to the next.
Use TempDB as a scratchpad (as MS-SQL Server does) to hold temporary data values and tables. TempDB is especially useful for aggregating data values from multiple tables in order to generate a summary report. Rather than trying to write an SQL statement that both selects and summarizes data, you can simplify your task by writing a query that aggregates the data you want in a temporary TempDB table, and then execute a simple second query to produce your final report
MS-SQL Server puts all database objects (tables, views, procedures, triggers, indexes, and so on) into a single large file. Whenever you make a change to the database (add an object, alter an object, delete a row, update a column value, insert a row, and so on), the DBMS makes an entry in a second file, the transaction log. Thus, every database has two files: the database file, which contains all of the database objects; and the transaction log, which contains an entry for each change made to the database (since the last time the log was cleared).
Note
The database file and transaction log can each be made up of more than one physical file. However, the DBMS treats the set of physical files used to hold the database data as a single, logical "database file" and the set of physical files used to hold the transaction log as a single, logical "transaction log" file. You can set the initial size of each individual file, but the FILEGROWTH option applies to the logical database file and transaction log, not to each physical file used to store them on disk.
As you learned in Tip 41, "Using the CREATE DATABASE Statement to Create an MS-SQL Server Database and Transaction Log," and Tip 42, "Using the MS-SQL Server Enterprise Manager to Create a Database and Transaction Log," you use the SIZE option to specify the initial size of the database and transaction log when you create them. For example, in Tip 41, you executed the SQL statement
which created the SQLTips database file (SQLTIPS_DATA.MDF) with an initial size of 10MB and the transaction log for the database (SQLTIPS_LOG.LDF) with an initial size of 3MB. As you add rows to tables in the database, you use up the free space in the database file. If you add data to a table where each row consists of 10 columns of type CHAR(100), you use up 1,000 bytes (10 columns X 100 bytes / column) of the 10MB available each time you add a row to the table.
Once you've used all of the free space in a database file (10MB, in the current example) you can no longer add data to the database, even if there is a large amount of physical disk storage space available. To avoid running out of room in the database file before exhausting the physical disk space, use the FILEGROWTH option when you create a database. The FILE-GROWTH option tells MS-SQL Server to extend the size of the database file each time it gets full.
In the current example, you set FILEGROWTH to 1MB, which means that each time you use up the space allocated to the database file, the DBMS will increase the size of the file by 1MB. Moreover, since you did not specify a maximum database file size, the DBMS will extend the database file 1MB at a time (as necessary) until it exhausts the physically disk storage space.
Each time you make a change to the database, the DBMS stores the original data values and makes a notation detailing what was done in the transaction log. As such, the DBMS may use up the 3MB allocated to the transaction log in the current example rather quickly if you are making a lot of changes to the database. Fortunately, you can have MS-SQL Server extend the size of the transaction log, just as it does the size of the database file.
In the current example, the DBMS will add 1MB of free space to the transaction log each time the transaction log file fills up.
Note
Although the current example uses the same FILEGROWTH value for the database file and the transaction log, the two are independent. For example, you can set the FILEGROWTH at 5MB for the database file and 3MB for the transaction log-one does not depend on the other.
Be sure to specify a large enough initial database file size and growth factor so that your DBMS isn't spending the majority of its time extending the size of the database file as you add table rows. To determine the initial database file size, perform the following analysis on each table in the database:
List the column name, data type, and number of bytes of disk space the DBMS will need to store a value in the column. (Your system manual will have a breakdown of the storage required for the data types your DBMS supports.)
Determine the number of rows you expect the table to hold within the first six months (or year) of operation.
Multiply the number of bytes per row times the number of rows in the table to determine the storage requirements of the table.
Once you know the storage required for each table in your database, set the initial size of the database file to 25-50 percent more than the sum of the space required by all of its tables. The extra space (50 percent, if possible), allows for a margin of error for your guess as to the number or rows you expect each table to hold, leaves space for indexes the DBMS can add to speed up data access, and gives the DBMS room for system cursors and for temporary tables it creates when processing complex queries with large result sets.
Set the FILEGROWTH option to 10 percent of the initial database file size, rounded up to the nearest whole number. Thus, if your initial database file size is 25MB, set your FILE-GROWTH to 3MB. Monitor the size of your database file, especially during the first several months of operation. If you find the database file growing at more than 10 percent in a month, increase the FILEGROWTH option so that the DBMS has to extend the database file size only once a month.
As a general rule of thumb, set the initial size of your transaction log file to 25 percent of the initial size of your database file, and set its FILEGROWTH to 10 percent of its initial size. Thus, if your initial database file size is 250MB, set the transaction log file to start at 25MB and grow by 3MB. Monitor the growth in size of your transaction log, and adjust its growth factor so that the DBMS has to extend it at most only once per month.
You learned how to set the initial file size and the growth increment (FILEGROWTH) for your database and transaction log files using the CREATE DATABASE statement in Tip 41 and using the MS-SQL Server Enterprise Explorer in Tip 42. After you've created the database file and transaction log, you can use the Enterprise Manager to change the size of either the file or its growth factor by performing the following steps:
To start the Enterprise Manager, click on the Start button, move your mouse pointer to Programs on the Start menu, select Microsoft SQL Server 7.0, and click your mouse on Enterprise Manager.
To display the list of SQL Servers, click on the plus (+) to the left of SQL Server Group.
To display the list of resources on the SQL Server with the database file or transaction log you want to modify, click on the plus (+) to the left of the SQL Server's name. For example, if you want to work with the SQL Server NVBizNet2, click on the plus (+) to the left of NVBizNet2. Enterprise Manager will display a list of folders that represent the resources managed by the SQL Server NVBizNet2 (in the current example).
Click on the Databases folder. The Enterprise Manager will display the databases on the SQL Server in its right pane.
Double-click your mouse on the database icon whose database file or transaction log you want to modify. For the current example, double-click your mouse on SQLTips (if you created the database in Tip 41). Enterprise Manager will display the General tab of the SQLTips Properties dialog box similar to that shown in Figure 44.1. (The name of the dialog box is Properties.) As such, your dialog box will be SQLTips Properties only if you double-clicked your mouse on the SQLTips database.
Figure 44.1: The Enterprise Manager database properties dialog box
Click on the Space Allocated field in the Database files area of the dialog box. For the current example, change the 10 to 15.
To have the database file grow by a percentage of its current size instead of by a constant number of megabytes, click your mouse on the By Percent radio button in the File Properties area of the dialog box. For the current example, leave the percentage the default, 10 percent.
If you want to restrict the database file growth to a certain number of megabytes, click on the Restrict Filegrowth (MB) radio button and enter the maximum file size in megabytes. For the current example, allow for unrestricted file growth by clicking on the Unrestricted Filegrowth radio button.
Click on the Transaction Log tab to work with the transaction log properties. For the current example, leave the transaction log properties unchanged. However, if you did want to change the transaction log options, you would follow Steps 6 to 8, substituting "transaction log" for "database file" in each step.
Click on the OK button. The Enterprise Manager will apply your changes to the SQLTips database and return to the Enterprise Manager application window.
The optimal initial size and growth increment for a database and transaction log depend on the amount of data, amount of physical storage space available, and volume of transactions you expect the DBMS to handle. If you're converting from one DBMS product to another, base your size and increment settings on historical requirements. Otherwise, use the figures in this tip as a reasonable starting point. The important thing to understand is that while you don't want to allocate space you'll never need, you also want the DBMS to spend as little time as possible increasing the size of the database file and transaction log.
Dropping (deleting) databases you no longer need frees up disk space. The primary rule to follow: Be careful! You cannot easily undo an executed DROP DATABASE statement. As such, always back up the database before dropping (erasing) it. Having a full backup will save you a lot of headaches if the user decides he or she needs "one more thing" from the database-right after you erase it, of course.
Only the system administrator (sa) or a user with dbcreator or sysadmin privilege can drop a database. You cannot drop the MASTER, MODEL, or TempDB database.
The syntax of the DROP DATABASE statement is:
DROP DATABASE
             [,,  ]
Thus, to remove the MARKETING database you created in Tip 42, "Using the MS-SQL Server Enterprise Manager to Create a Database and Transaction Log," perform the following steps:
Start the MS-SQL Server Query Analyzer (as you learned to do in Tip 38, "Using the MS-SQL Server Query Analyzer to Execute SQL Statements"), or start the Enterprise Manager (as you learned to do in Tip 42) and select the Tools menu, SQL Server Query Analyzer option.
Enter the DROP DATABASE statement in the Query Analyzer's Query pane. For the current project, type
DROP DATABASE marketing.
Press Ctrl+E (or select the Query menu, Execute option).
After you complete Step 3, the Query Analyzer will attempt to delete the database and log file. If Query Analyzer successfully deletes the MARKETING database and transaction log, it will display the following in the Results pane of the Query Analyzer application window:
In Tip 41, "Using the CREATE DATABASE Statement to Create an MS-SQL Server Database and Transaction Log," you learned that MS-SQL Server lets you create multiple databases on a single server, and you also learned how to use the CREATE DATABASE statement. Like most database management tools, MS-SQL Server gives you not only a command line (SQL or Transact-SQL) statement, but also a graphical user interface (GUI) tool to perform the same function. To create a database using the MS-SQL Server Enterprise Manager, perform the following steps:
Click your mouse on the Start button. Windows will display the Start menu.
Move your mouse pointer to Programs on the Start menu, select the Microsoft SQL Server 7.0 option, and click your mouse on Enterprise Manager. Windows will start the Enterprise Manager in the SQL Server Enterprise Manager application window.
Click your mouse on the plus (+) to the left of SQL Server Group to display the list of MS-SQL Servers available on your network.
Click your mouse on the plus (+) to the left of the SQL Server on which you wish to create a database. Enterprise Manager, in turn, will display a Database Properties dialog box similar to that shown in Figure 42.2
Click your mouse on the Databases folder to display the list of databases currently on the server, similar to that shown in Figure 42.1.
Figure 42.1: The SQL Server Enterprise Manager application window
Select the Action menu New Database option. Enterprise Manager displays a Database Properties dialog box similar to that shown in Figure 42.2.
Figure 42.2: The Enterprise Manager Database Properties dialog box
Enter the name of the database in the Name field. For the current project, enter MARKETING. The Enterprise Manager will automatically fill in the pathname and initial database size in the Database Files section of the Database Properties dialog box.
Note
If you want to put the database in a folder other than the default folder or change the physical file name, click your mouse on the Search button in the Location field in the Database Files area of the Database Properties dialog box. Enterprise Manager will display the Locate Database File dialog box so you can select a folder or change the database's physical file name.
Click on the Initial size (MB) field and enter the initial size of the database file. For the current project, enter 10.
Set the database File Growth and Maximum File Size options. For the current project, accept the defaults, which allow the database file to grow by 10 percent each time it fills up and place no restriction on its maximum size.
Click on the Transaction Log tab.
If you want to change the pathname (the file name and physical location) of the transaction log file, click on the Search button in the Location field to work with the Locate Transaction Log File dialog box. For the current project, accept the default pathname for the transaction log.
Click on the Initial size (MB) field, and enter the initial size of the transaction log. For the current project, enter 3.
Set the database File Growth and Maximum File Size options. For the current project, accept the defaults, which allow the transaction log to grow by 10 percent each time it fills up and place no restriction on its maximum size.
Click on the OK button.
After you complete Step 14, the Enterprise Manager will create the database (MARKETING, in the current example) according to the options you selected and return to the SQL Server Enterprise Manager application window.
The important thing to know now is that MS-SQL Server gives you two ways to create a database. You can use the CREATE DATABASE statement or use the Enterprise Manager's Action menu New Database option. Whether you use CREATE DATABASE or the Enterprise Manager, you can set database and transaction log options that specify:
The physical locations (pathnames) of the database and transaction log file(s)
The initial size of the database and transaction log
The increment by which the database and transaction log will grow
The maximum size to which the database and transaction log file(s) can grow
If you are using CREATE DATABASE, you specify the database and transaction log properties in separate clauses within the statement. When you use the Enterprise Manager to create a database, you can still specify different properties for the database and transaction log file(s) by using the Database Properties dialog box General tab to specify database options and using the Transaction Log tab to select transaction log options.
Unlike many other DBMS products, MS-SQL Server lets you create multiple databases for each MS-SQL Server. Most commercial DBMS products do not even have a CREATE DATABASE command. Instead, the installation program creates the one database file the SQL Server will use. The database administrator (dba) and privileged users then create all of the database objects in the one database. As a result, the typical database contains a mix of both related and unrelated tables.
MS-SQL Server gives you the best of both worlds. If you want, you can create a single database for all of your tables, or you can separate totally unrelated tables into separate databases. Suppose, for example, that you and your spouse each run your own home business. Using the typical DBMS, you would create one database to hold both your (mail order) CUSTOMER list and your spouse's (accounting) CLIENT list, even though the two tables are completely unrelated.
Having a single database means that both businesses would lose database access during backup and (if necessary) recovery operations. If the two were separate, you could still use a single server (to save a bit of hard-earned cash on software and hardware), but you would not be affected by database problems or maintenance activities that have nothing to do with your own tables.
Finally, MS-SQL Server's multiple database strategy makes it possible to create a development database that uses the same database objects and security setup as its production counterpart. Having an identical database structure and security setup makes it easier to test how proposed changes will affect online application programs, database stored procedures, views, and triggers. Moreover, once you've fully tested new or modified code on the development system, you will be able to install procedures, triggers, and views on the production system without further modification. Finally, you can import data from tables in the production database into identical tables in the development database, making it easy to use the development system to "freeze" database data and reproduce errors that seem to occur at random intervals.
Review Table 41.1 for a brief explanation of CREATE DATABASE keywords and options.
Table 41.1: Definition of CREATE DATABASE Statement Keywords and Options
Keyword/Option
Description
database name
The name of the database.
ON
The name(s) of the disk file(s) that will hold the data portion of the database. MS-SQL Server lets you split a single database into multiple files.
PRIMARY
If you split the database into multiple files, PRIMARY identifies the file that contains the start of the data and the system tables. If you don't specify a PRIMARY file, MS-SQL Server will use the first file in the list as the PRIMARY file.
LOG ON
The name(s) of the disk file(s) that will hold the transaction log.
FOR RESTORE
Do not allow access to the database until it is filled with data by a RESTORE operation.
The name the MS-SQL Server will use to reference the database or transaction log.
The full pathname to the database or transaction log file.
The initial size, in megabytes, of the database or transaction log. If you don't specify an initial size for the transaction log, the system will size it to 25 percent of the total size of the database files.
The maximum size to which the database or transaction log can grow. If you specify UNLIMITED, the files can grow until they exhaust the physical disk space.
The number of bytes to add to the size of the transaction log or database file when the current free space in the file is used up.
To create a database using the MS-SQL Server Query Analyzer, perform the following steps:
Click your mouse on the Start button. Windows will display the Start menu.
Move your mouse pointer to Programs on the Start menu, select the Microsoft SQL Server 7.0 option, and click your mouse on Query Analyzer. Query Analyzer will display the Connect to SQL Server dialog box similar to that shown in Figure 41.1.
The Query Analyzer Connect to SQL Server dialog box
Enter the name of your SQL Server in the SQL Server field.
Enter your username in the Login Name field, and enter your password in the Password field.
Click on the OK button. Query Analyzer will connect to the SQL Server you entered in Step 3 and display the Query pane in the SQL Server Query Analyzer application window.
Enter the CREATE DATABASE statement. For the current example, enter:
Click on the green arrow Execute Query button on the standard toolbar (or select the Query menu Execute option). Query Analyzer will create the database on the SQL Server to which you connected in Step 5.
After you complete Step 7, the Query Analyzer will display the results of the CREATE DATABASE execution in the Results pane in the SQL Server Query Analyzer application window. If Query Analyzer is successful in executing your CREATE DATABASE statement, the program will display the following in the Results pane:
 The CREATE DATABASE process is allocating 10.00 MB on disk   'SQLTips_data'.
The CREATE DATABASE process  is allocating 3.00 MB on disk  "SQLTips_log'.
Before sending SQL statements to the DBMS when you enter the GO command, ISQL acts as a line editor. As you learned in Tip 39, "Using the MS-SQL Server ISQL to Execute SQL Statements from the Command Line or Statements Stored in an ASCII File," the format of the command to start ISQL at the MS-DOS command line is:
ISQL -S -U -P
Note
Substitute the name of your SQL Server for NVBizNet2, and use your own username and password for login if the sa account is not available to you.
Thus, to log in to the NVBizNet2 MS-SQL Server as username sa, perform the following steps:
Click your mouse on the Start button, select Programs, and click your mouse on Command Prompt. Windows will start an MS-DOS session.
To start ISQL, type ISQL -SNVBizNet2 -Usa -P and press the Enter key. ISQL will display its Ready prompt (1>).
Next, enter the SQL SELECT statement:
SELECT * FROM authors
Press the Enter key. After ISQL puts your statement in its statement buffer, your screen will appear similar to the following:
ISQL -SNVBizNet2 -Usa -P
1> SELECT * FROM authors
2>
Since you did not identify the database you want to use, ISQL will display the following if you enter GO and press the Enter key at the Ready prompt (2>).
 Msg 208, Level 16, State 1, Server NVBIZNET2, Line 1
Invalid object name 'authors'.
Because ISQL is a line editor interface, you cannot move your cursor in front of SELECT and insert a statement. Thus, if you had only ISQL, your only choice would be to enter EXIT or QUIT at the Ready prompt (2>) and start over, this time either adding the -d parameter to the ISQL command line or typing USE in response the first Ready prompt (1>).
Fortunately, ISQL lets you use the MS-DOS full-screen editor.
To start the full screen editor, type ED at a ready prompt (2>) and press the Enter key. ISQL will start the MS-DOS editor and transfer the contents of its statement buffer, similar to that shown in Figure 40.1.
Figure 40.1: The MS-DOS full-screen editor as started by ISQL
To insert the USE statement in front of the SELECT statement, move your cursor in front of the word SELECT. Type USE pubs and press the Enter key. Once you've done that, you will have two statements in the text editor:
 USE pubs
SELECT *  FROM authors
To transfer the contents of the full-screen editor to the ISQL statement buffer, select the File, Exit option. When the editor prompts you to save your changes, press Y. The MS-DOS editor will send its contents to ISQL which will display them as individual lines similar to:
 1> USE pubs
2> SELECT * FROM authors
3>
Now, type GO and press the Enter key to send the USE and SELECT statements to the DBMS. After ISQL displays the query results, type EXIT and press the Enter key to exit ISQL and return to the MS-DOS prompt.
The important things to know are:
You can work in single-line edit mode by typing your SQL statements in response to each ISQL Ready prompt.
ISQL stores each statement you enter in its statement buffer.
You can use a full-screen editor by entering ED in response to an ISQL Ready prompt.
When you start the full-screen editor (with the ED command), ISQL copies the contents of its statement buffer to the editor screen.
When you leave the full-screen editor (by selecting the File menu Exit option), ISQL reads the contents of the editor screen into its statement buffer as one statement per editor line.
In Tip 38, "Using the MS-SQL Server Query Analyzer to Execute SQL Statements," you learned how to use the MS-SQL Query Analyzer GUI query tool. MS-SQL Server also includes two command-line query tools: ISQL.EXE and OSQL.EXE. You'll find both of these tools in MS-SQL Server's BINN subdirectory. (If you installed MS-SQL Server to the default C:\MSSQL7 folder, you will find ISQL and OSQL in the C:\MSSQL7\BINN sub-folder.)
Aside from the name, the only difference between ISQL and OSQL is that ISQL uses DB-LIB to connect to the database, whereas OSQL uses ODBC. Although we'll use ISQL to access that database in this tip, the important thing to know is that you can execute the same statements using OSQL. Thus, if you have only OSQL on your system, just use it in place of ISQL in the following example.
The command-line query tools are useful if you find yourself running a series of SQL statements. You can use ISQL (or OSQL) to execute the statements one after another by typing them into an ASCII that you pass to ISQL or OSQL for processing. The command-line tools also give you a quick, low overhead way to test your SQL queries.
Note
You will need to install MS-SQL Server prior to using either of the two command-line query tools (ISQL or OSQL). Tip 527 gives you step-by-step instructions for installing MS-SQL Server, if you have not yet installed it on your computer system.
If you are using the computer on which you installed MS-SQL Server, you need type only I SQL or OSQL at the MS-DOS prompt to start the query tool because the installation program added the C:\MSSQL7\BINN folder in your path. If you are attaching to the MS-SQL Server across a network, have your system administrator give you access to the MSSQL7\BINN\OSQL.EXE on the server. (In order to use ISQL.EXE, you must install NTWDBLIB.DLL on your computer—OSQL.EXE does not require an additional DLL file.)
Before you can start using ISQL, you must get to an MS-DOS prompt. If you have an MS-DOS icon on your desktop, double-click on it. Otherwise, click your mouse on the Start button, select Programs, and then click your mouse on Command Prompt. Windows will start an MS-DOS session.
The format of the command to start ISQL is:
ISQL -S -U -P
(If you want to see the list of all ISQL command line parameters, type ISQL-? and then press the Enter key.)
To use ISQL to attach to your MS-SQL Server, replace with the name of your MS-SQL Server, and replace and with your login name and password. For example, to attach to the MS-SQL Server NVBizNet2 using the login name sa, which has no password, type
ISQL -SNVBizNet2 -Usa -P
and then press the Enter key. ISQL will display its equivalent of the MS-DOS prompt, similar to that shown in Figure 39.1.
The ISQL response to the - ? parameter, followed by the ISQL Ready prompt (1>) after ISQL successfully attached to the NVBizNet2 SQL Server
Once you see the ISQL Ready prompt, perform the following steps to send SQL statements to the SQL server:
Type an SQL statement at the Ready (1>) prompt. For the current example, type USE pubs (to tell the SQL Server you want to use the PUBS database), and then press the Enter key. ISQL will respond with the Ready prompt 2>, indicating that it is ready for you to enter the second line of commands.
Type an SQL statement. For the current example, type SELECT * FROM authors WHERE zip = 94609 and then press the Enter key. ISQL will respond with the Ready prompt 3>, waiting for the third statement or command.
If you have additional statements you want ISQL to send to the server as a group, repeat Step 2 until you finish entering.
Type GO and the press the Enter key to tell ISQL to send your SQL statements to the SQL server.
After you complete Step 4, ISQL will send the SQL statements you entered prior to the GO command to the DBMS, display the results, and then indicate that it is ready for your next command by displaying another Ready prompt (1>).
The important thing to understand is that ISQL sends your SQL statements to the SQL Server only after you type GO at a ready prompt and press the Enter key.
To exit ISQL, type EXIT at a ready prompt and then press the Enter key. ISQL will terminate and your computer will return to the MS-DOS prompt.
To exit your MS-DOS session and return to the Windows desktop, type EXIT at the MS-DOS prompt and press the Enter key.
Note
By typing USE pubs in Step 2, you told the DBMS that you wanted to use the PUBS database. Instead of having ISQL send the USE statement to the DBMS, you can select the database you want to use by adding -d
ISQL -SNVBizNet2 -Usa -P -dpubs
To start ISQL, log in to the sa account on the NVBizNet2 SQL Server and select PUBS as the database to use in subsequent SQL statements.
As mentioned at the beginning of this tip, you can type SQL statements into an ASCII file and then have ISQL (or OSQL) execute them. To do so, add the -i parameter when typing the ISQL startup command. Suppose, for example, that you had the following statements in a file named INFILE39.SQL:
USE pubs
SELECT au_ID, au_lname, zip FROM authors WHERE zip = 94301
GO
You could tell ISQL to send the two statements in INFILE39.SQL to the DBMS and display the results to the screen by starting ISQL with the command line:
ISQL -SNVBizNet2 -Usa -P -dpubs -iInFile39.sql -n
The -n tells ISQL not to display statement numbers. Without the -n, ISQL will display a statement number and the greater than (>) symbol for each of the three SQL statements. As a result, the headings won't line up with the column data. The -n tells ISQL not to display the statement line numbers. After you enter the command line, press the Enter key. ISQL will send each of the statements in the input file InFile39.sql to the DBMS and display output similar to:
You can use the MS-SQL Server Query Analyzer (QA) to execute any SQL statement supported by MS-SQL Server. (As mentioned in previous tips, no commercially available database supports everything in the SQL-92 standard.) QA has a graphical user interface (GUI) you can use to pose ad hoc (interactive) queries and to send SQL commands to an MS-SQL Server. (MS-SQL Server also provides a command-line interface to the database through ISQL, which you will learn about in Tip 39, "Using the MS-SQL Server ISQL to Execute SQL Statements from the Command Line or Statements Stored in an ASCII File.")
Note
You will need to install MS-SQL Server prior to using the Query Analyzer. Tip 527 gives you step-by-step instructions for installing MS-SQL Server, if you have not yet installed it on your computer system.
To start to start MS-SQL Server QA, perform the following steps:
Click on the Start button. Windows will display the Start menu.
Select Programs, Microsoft SQL Server 7.0 option; click on Query Analyzer. Windows will start QA and display a Connect to SQL Server dialog box similar to that shown in Figure 38.1.
The MS-SQL Server Query Analyzer Query pane in the Query Analyzer window
When you install MS-SQL Server under Windows NT, the installation program creates several databases, as shown in the DB drop-down list in the right corner of the Query pane in Figure 38.2. Before using QA to send SQL statements to the MS-SQL Server, you must select a database.
To work with the pubs (sample) database, perform the following steps:
Click on the drop-down button to the right of the DB field (in the upper-right corner of the QA Query pane) to list the databases on the SQL Server to which you are connected.
Click on a database to select it. For the current example, click on pubs.
Place your cursor in the Query pane by clicking anywhere within it. QA will place the cursor in the upper-left corner of the Query pane.
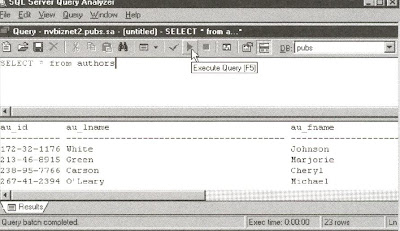
Enter your SQL statement in the Query pane. For the current example, enter SELECT * FROM authors.
To execute the query (entered in Step 4), either press F5 or Ctrl+E, or select the Query menu Execute option. For the current example, press F5. QA will display your query results in a Results pane below the Query pane, similar to that shown in Figure 38.3.
The Query Analyzer, with a query in the Query pane and query results in a Results pane
Whenever you tell QA to execute the SQL in the Query pane, QA will send all of the statements in the Query pane to the SQL Server for processing, unless you select a specific statement (or set of statements) you want to execute. So, be careful you don't press Ctrl+E (or press F5, or select the Query menu Execute option), thinking that QA will send only the last statement you typed to the SQL server.
If you have multiple statements in the Query pane, either remove the ones you don't want to execute, or highlight the statement(s) that you want QA to send to the SQL Server for processing. For example, if you, you had the following statements in the Query pane
SELECT * FROM authors


SELECT * FROM authors WHERE au_lname = 'Green'
and you only wanted to execute the second statement, highlight the second query to select it and then select the Query menu Execute option (or click on the green Execute Query button on the standard toolbar). QA will send only the second select statement to the SQL Server and display the results in the Results pane, similar to that shown in Figure 38.4.
Having QA retain SQL statements in the Query pane after it executes them can save you a lot of typing, especially if you enter a complex query and don't get the results you expect. If you need to change the logic of your query's selection clause, you need only click your cursor in the SQL statement and make your change, without having to retype the entire statement.
SQL keywords are words that have a special significance in SQL and should not be used as user-defined names for database objects such as tables, columns, domains, constraints, procedures, variables, and so on. There are two types of keywords, reserved and nonreserved. The difference between reserved and nonreserved keywords is that some database products let you (although you should not) use nonreserved keywords to name database objects and variables. To make your SQL statements portable and less confusing, avoid using reserved words as identifiers.
When writing SQL statements, use all capital letters for keywords and lowercase letters for nonkeywords (or vice versa). Keywords are case-insensitive, meaning that the DBMS will recognize a keyword whether you type it using all capital letters, lowercase letters, or a combination of both. Making the case (capital vs. lower case) of reserved words different than non-reserved words in SQL statements makes the SQL statements easier for you (and those responsible for maintaining your database creation) to read.
Since each DBMS product supports most SQL-92 reserved words and adds a few of its own, the system manual and online help system are your best source for a list of reserved words. For example, to review MS-SQL Server's list of reserved words, perform the following steps:
Click on the Start button. Windows will display the Start menu.
Select Programs, Microsoft SQL Server 7.0 option, and click on Books Online. Windows will start the MS-SQL Server Help system.
Click on the Index tab and enter KEYWORDS in the Type in the Keyword to Find field. The MS-SQL Server Help system will display an alphabetical list of terms starting with Keywords.
To see a list of reserved keywords, click on Reserved and then click on the DISPLAY button. The Help system will display a dialog box asking you to select the type of reserved words on which you want its assistance.
Click on Reserved Keywords (T-SQL) and then click on the DISPLAY button. The MS-SQL Server Help system will display a list of T-SQL (Transact-SQL) reserved words, followed by a list of ODBC reserved words. The ODBC reserved words include the SQL-92 reserved words that MS-SQL Server supports. (Transact-SQL is MS-SQL Server's own procedural SQL language; Oracle uses PL/SQL and SQL Plus*.)
To exit the Help system, click on the close button (the X) in the upper-right corner of the Help application window.
When processing an SQL statement, the DBMS goes through five steps:
Parse. The DBMS goes through the SQL statement word by word and clause by clause to make sure that all of the keywords are valid and all of the clauses are well-formed. The DBMS will catch any syntax errors (badly formed SQL expressions) or typographical errors (misspelled keywords) during the parsing stage.
Validate. The DBMS will check to make sure that all tables and columns named in the statement exist in the system catalog, as well as make sure there are no ambiguous column name references. During the validation step, the DBMS will catch any semantic errors (invalid references or valid references to nonexistent objects) and access violations (attempts to access database objects or attempts to execute SQL statements to which the user does not have sufficient privilege).
Optimize. The DBMS runs an optimizer to decide on the best way to carry out the SQL statement. For a SELECT statement, for example, the optimizer checks to see if it can use an INDEX to speed up the query. If the query involves multiple tables, the optimizer decides if it should join the tables first and then apply the search condition, or vice versa. When the query appears to involve a scan of all rows in the table, the optimizers determines if there is a way to limit the data set to a subset of the rows in order to avoid a full table scan. Once the optimizer runs through all of the possibilities and gives them a rating based on speed (efficiency) and safety, the DBMS chooses one of them.
Generate execution plan. The DBMS generates a binary representation of the steps involved in carrying out the SQL statement based on the optimization method suggested by the optimizer. The execution plan is what is stored when you create an MS-SQL Server procedure and what is generated when you prepare a dynamic SQL query. Generating the execution plan is the DBMS equivalent of compiling an application program to produce the .EXE file (the executable code).
Execute. The DBMS carries out the action specified by the SQL statement by executing the binary execution plan.
Different steps in the process put different loads on the DBMS and server CPU. The parsing requires no database access and very little CPU time. Validation requires some database access but does not put too much of a load on the DBMS. The optimization step, however, requires a lot of database access and CPU time. In order to optimize a complex, multi-table query, for example, the optimizer may explore more than 20 ways to execute the statement.
The reason you don't just skip the optimization step is because the "cost" of doing the optimization is typically much less than the cost of performing the SQL statement in less than the most efficient manner. To put it another way, the reduction in time it takes to complete a well-optimized query more than makes up for the time spent in optimizing the query. Moreover, the more complex the query, the greater the benefits of optimization.
One of the major benefits of using procedures is being able to avoid performing the same parsing, validation, and (especially) optimization steps over and over again. When you enter an SQL query using an interactive tool (such as the MS-SQL Server Query Analyzer), the DBMS has no choice but to go through the entire five-step execution processor, even if you type in the same query multiple times.
If you put your SQL statement (or statements) into a stored procedure, however, the DBMS can parse, validate, optimize, and develop the execution plan in advance. Then, when you call the procedure, the DBMS needs only to execute the already compiled execution plan. Precompiled procedures let the DBMS avoid the "expensive" optimization phase the second and subsequent times you execute the SQL statements in the procedure. Thus, procedures let you move the first four steps of the execution process to the development environment, which reduces the load on the online production DBMS (and server).
When using SQL to send commands to the DBMS, you first tell the DBMS what you want to do and then describe the data (or structure) on which you want the DBMS to take the action. SQL is similar to the German language in that you put the action word (the verb) at the beginning of the sentence (the SQL statement) and then follow the verb with one or more clauses that describe the subject (the database object, or set of rows) on which you want the DBMS to act. Figure 35.1 shows the basic form of SQL statements.
Figure 35.1: Basic structure of an SQL statement
As shown in Figure 35.1, each SQL statement begins with a keyword that describes what the statement does. Keywords you'll find at the beginning of SQL statements include: SELECT, INSERT, UPDATE, DELETE, CREATE, or DROP. After you tell the DBMS what you want done, you tell it the columns of interest and the table(s) in which to look. You normally identify the columns and tables you want to use by listing the columns after the verb (at the start of the SQL statement) and by listing the table(s) after the keyword FROM.
After you tell the DBMS what to do and identify the columns and tables to which to do it, you finish the SQL statement with one or more clauses that either further describe the action the DBMS is to take, or give a description of the data values that identify tables rows on which you want you want to DBMS to act. Typical descriptive clauses begin with the keywords: HAVING, IN, INTO, LIKE, ORDER BY, WHENEVER, WHERE, or WITH.
ANSI/ISO SQL-92 has approximately 300 reserved words of which you will probably use about 30 to do the majority of your work with the database. Table 35.1 lists some of the most commonly used keywords. Although some of the keywords are applicable only to MS-SQL Server, you will find keywords that perform similar functions if you are using another vendor's DBMS.
Table 35.1: Commonly Used SQL and MS-SQL Server Keywords
Keyword
Description
Data Definition Language (DML)
CREATE DATABASE
(MS-SQL Server). Creates a database and transaction log. A database has one or more schemas, which contain database objects such as tables, views, domains, constraints, procedures, triggers, and so on.
DROP DATABASE
(MS-SQL Server). Erases a database and transaction log.
CREATE SCHEMA
Adds a named container of database objects to the database. A database may have more than one schema. All database objects (tables, views, domains, constrains, procedures, triggers, and so on) reside in one of the schemas within the database.
DROP SCHEMA
Removes a schema from a database.
CREATE DOMAIN
Creates a named list of allowable values for columns in database tables. You can use domains as data types for columns in multiple tables.
DROP DOMAIN
Removes a domain definition from the database.
CREATE TABLE
Creates a structure (table) of columns and rows to hold data.
ALTER TABLE
Adds columns to a table, removes columns from a table, changes column data types, or adds column constraints to a table.
DROP TABLE
Removes a table from the database.
CREATE VIEW
Creates a database object that displays rows of one or more columns from one or more tables. Some views allow you to update the base tables.
DROP VIEW
Drops a database view.
CREATE INDEX
Creates a structure with values from a table column, which speeds up the DBMS's ability to find specific rows within the table.
DROP INDEX
Removes an INDEX from the database.
Data Manipulation Language (DML)
INSERT
Adds one or more rows to a table.
SELECT
Retrieves database data.
UPDATE
Updates data values in a table.
DELETE
Removes one or more rows from a table.
TRUNCATE
(MS-SQL Server). Removes all rows from a table.
Data Control Language (DCL)
ROLLBACK
Undoes changes made to database objects, up to the last COMMIT or SAVEPOINT.
COMMIT
Makes proposed changes to the database permanent. (COMMITTED changes cannot be undone with a ROLLBACK.)
SAVEPOINT
Marks points in a transaction (set of actions) that can be used to ROLLBACK (or undo) a part of a transaction without having to undo the entire transaction.
GRANT
Gives access to database objects or SQL statements.
REVOKE
Removes access privileges to database objects or executes specific SQL statements.
Programmatic SQL
DECLARE
Reserves server resources for use by a cursor.
OPEN
Creates a cursor and fills it with data values selected from columns in one or more rows in one or more database tables.
FETCH
Passes data values from a cursor to host variables.
CLOSE
Releases the resources used to hold the data copied from the database into a cursor.
DEALLOCATE
Releases server resources reserved for use by a cursor.
CREATE PROCEDURE
(MS-SQL Server). Creates a named list of SQL statements that a user (with the correct access rights) can execute by using the name as he or she would any other SQL keyboard.
ALTER PROCEDURE
(MS-SQL Server). Changes the sequence of SQL statements that the DBMS will perform when the user calls a procedure.
DROP PROCEDURE
(MS-SQL Server). Removes a procedure from the database.
CREATE TRIGGER
(MS-SQL Server, DB2, PL/SQL). Creates a named sequence of SQL statements that the DBMS will execute automatically when a column has a specific data value or when a user attempts a specific database command (the triggering event).
ALTER TRIGGER
(MS-SQL Server, DB2, PL/SQL). Changes the SQL statements executed when the DBMS detects the triggering event, or changes the nature of the event.
DROP TRIGGER
(MS-SQL Server, DB2, PL/SQL). Removes a trigger from the database.
DESCRIBE INPUT
Reserves an input area an application program will use to pass values to the DBMS during a dynamic SQL statement.
GET DESCRIPTOR
Tells the DBMS to use the DESCRIPTOR area to retrieve data values placed there by an application program during a dynamic SQL statement.
DESCRIBE OUTPUT
Reserves an output area the DBMS will use to pass data from the database to an application program during a dynamic SQL statement.
SET DESCRIPTOR
Tells the DBMS to place data into the DESCRIPTOR area for retrieval by an application program during a dynamic SQL statement.
PREPARE
Tells the DBMS to create an execution plan or compile the SQL statement(s) in a dynamic SQL statement.
EXECUTE
Tells the DBMS to execute a dynamic SQL statement.
You will find several tips on each of the common SQL statements (and others that are important, though not commonly used), throughout this book. The important thing to know now is that all SQL statements begin with a keyword (verb), have a list of objects on which to act, and may have one or more clauses that further describe the action or identify the rows on which to act at the end of the statement. If the SQL statement does not contain clauses that limit the action to rows with specific column data values, the DBMS will take action on all of the rows in a table (or multiples tables through a VIEW).
Client/Server computing (often called n-tier computing when you use the Internet to connect the client to the server), involves distributed data processing, or multiple computers working together to perform a set of operations. In the client/server model, the client (workstations) and server (DBMS) work together to perform operations that create objects and manipulate the data in a database. Although they work together in the overall scheme of things, the tasks the server performs are different than the work accomplished by the clients.
The relational DBMS model and SQL are particularly suited for use in a client/server environment. The DBMS and data reside on a central server (computer), and multiple clients (network workstations) communicate requests for data to the server across connections on the local area network (LAN). The application program running on the client machine accepts user input and formulates the SQL statements, which it then sends to the DBMS on the server. The DBMS then interprets and executes the SQL commands, and sends the results back to the client (workstation). Finally, the application program running at the workstation formats and displays the results for the user.
Using the SQL client/server relationship is a much more efficient use of bandwidth as compared to a simple database file-sharing system where the workstation would copy large amounts of data from the fileserver, manipulate the data locally, and then send large amounts of data back to the fileserver to be stored on the network disk drives. Put another way, the older, more inefficient shared file access method involves sending you the entire filing cabinet and all of its folders. Your application program then has to sift through everything available to find the file folder it needs.
In the client/server model, the server rummages the filing cabinet for you and sends only the desired file folder to the application program. The user uses an application program running on a network workstation (the client) to send requests (using SQL statements) for data to the DBMS (the server). The DBMS and data reside on the same system, so the DBMS can execute the SQL statements and send only the data the user needs across the LAN to the workstation.
A DBMS (the server) has nothing to do until it receives a request (one or more SQL statements) from the client (network workstation). The server is responsible for storing, manipulating, and retrieving data for multiple clients. As such, the server hardware typically has multiple, high-end processors to handle simultaneous data requests and large amounts of fast storage, and it is optimized for fast data access and retrieval.
When processing SQL statements, the DBMS (server) interprets the commands and translates them into database operations. After executing the operations, the server then formats and sends the results to the client. Thus, the server's job is relatively straightforward: read, interpret, and execute SQL statements. Moreover, the server has no responsibility for presenting the information to the user-that job is left to the client.
The client portion of the SQL client/server system consists of hardware (often similar in processing power to the server) and software, the user's interface to the DBMS. When working with SQL, the user often does not even realize that there is a separate DBMS server involved. As far as the user is concerned, the application program (such as an order entry system) running on his or her computer is acting on data stored on a shared network drive. In reality, the client (application program) accepts user input, translates what the user enters into SQL commands, and sends the commands along with any data entered to the DBMS server. The application then waits for the server to send back the results, which the program then displays to the user.
In the client/server environment, the client is responsible for:
Accepting needed information from the user (or another application program)
Formulating the data retrieval, removal, or update request for the server
Displaying all information (data and server messages) to the user
Manipulating individual data items (the server takes care of the physical storage, removal, and retrieval of data, but data values are determined on the client side of the client/server model)
Formatting the information and producing any reports (both printed and online)
Note
You can reduce network traffic and server workload by duplicating some data validity checks in the client application. For example, having the application program force the user to enter a valid quantity before sending the columns in an order row to the DBMS will avoid sending the data to the server, having the DBMS parse the SQL statement only to send it back to the client as invalid.
Be sure to use validity checks on the client side of the client/server model in addition to (and not in place of) the server's SQL-defined data integrity mechanisms. By consolidating validation on the server (and duplicating it on the client where it makes senses), you ensure that EVERY application's data is validated using the same set of rules. If you trust the application to perform its own validation, you will invariably run into problems where validation code, omitted during the testing phase, is inadvertently left out of the production system as well. Moreover, if you need to change or add new business rules, changing server validity checks in one place (on the server) is relatively simple as compared to contacting each software vendor (or in-house programming staff) to update individual application programs.
As you learned in Tip 15, "Understanding Constraints," a constraint is a database object that restricts the data a user or application program can enter into the columns of a table. An assertion is a database object that uses a check constraint to limit data values you can enter into the database as a whole.
Both assertions and constraints are specified as check conditions that the DBMS can evaluate to either TRUE or FALSE. However, while a constraint uses a check condition that acts on a single table to limit the values assigned to columns in that table; the check condition in an assertion involves multiple tables and the data relationships among them. Because an assertion applies to the database as a whole, you use the CREATE ASSERTION statement to create an assertion as part of the database definition. (Conversely, since a constraint applies to only a single table, you apply [define] the constraint when you create the table.)
For example, if you want to prevent investors from withdrawing more than a certain amount of money from your hedge fund, you could create an assertion using the following SQL statement:
CREATE ASSERTION maximum_withdrawal
 CHECK (investor.withdrawal_limit>
        SELECT SUM(withdrawals.amount)
        FROM   withdrawals
        WHERE  withdrawals.investor_id = investor.ID)
Thus, the syntax used to create an assertion is:
CREATE ASSERTION
Once you add the MAXIMUM_WITHDRAWAL ASSERTION to the database definition, the DBMS will check to make sure that the assertion remains TRUE each time you execute an SQL statement that modifies either the INVESTOR or WITHDRAWALS tables. As such, each time the user or application program attempts to execute an INSERT, UPDATE, or DELETE statement on one of the tables in the assertion's CHECK clause, the DBMS checks the check condition against the database, including the proposed modification. If the check condition remains TRUE, the DBMS carries out the modification. If the modification makes the check condition FALSE, the DBMS does not perform the modification and returns an error code indicating that the statement was unsuccessful due to an assertion violation.
You can apply the IDENTITY property to one (and only one) of the columns in a table to have MS-SQL Server supply an incrementing, non-NULL value for the column whenever a row is added that does not specify the column's value. Suppose, for example, that you wanted to create an EMPLOYEE table that included an EMPLOYEE_ID column, but you did not want to supply the EMPLOYEE_ID each time you added a new employee to the table. You can have MS-SQL Server supply the "next" EMPLOYEE_ID each time a row is added by creating the EMPLOYEE table using an SQL statement similar to the following:
 CREATE TABLE employee
  (id    INTEGER IDENTITY(10,10),
   name  VARCHAR(35),
   quota SMALLINT)
The format of the IDENTITY property is:
IDENTITY (initial_value, increment)
If you omit the initial_value and increment, MS-SQL Server will set both the initial_value and the increment to 1.
The CREATE TABLE statement in the current example tells MS-SQL Server to assign a 10 to the ID column of the first row added to the EMPLOYEE table. Then, when you add subsequent rows to the table, MS-SQL Server will add 10 to the ID value in the last row of the table and assign that value to the ID column of the new row to be added. Thus, executing the SQL statements
INSERT INTO employee (name, quota)
 VALUES ('Sally Smith', NULL)
INSERT INTO employee (name, quota)
 VALUES ('Wally Wells', 5)
INSERT INTO employee (name, quota)
 VALUES ('Greg Jones', 7)
SELECT * FROM employee
MS-SQL Server will insert the three employee rows into the display and display them similar to the following:
id  name            quota
----------------------------
10  Sally Smith     NULL
20  Wally Wells     5
30  Greg Jones      7
You can apply the IDENTITY property only to columns of type INTEGER, INT, SMALLINT, TINYINT, DECIMAL, or NUMERIC—and only if the column does not permit NULL values.
Note
Specifying the IDENTITY property for a column does not guarantee that each row will have a unique value in that column. Suppose, for example, that you executed the SQL statements on the table in the current example:
SET IDENTITY_INSERT employee ON
INSERT INTO employee (id, name, quota)
 VALUES(20, 'Bruce Williams', NULL)
SET IDENTITY_INSERT employee OFF
INSERT INTO employee (name, quota)
 VALUES('Paul Harvey', 9)
SELECT * FROM employee
MS-SQL Server will display table rows similar to the following:
id  name            quota
----------------------------
10  Sally Smith     (null)
20  Wally Wells     5
30  Greg Jones      7
20  Bruce Williams  (null)
40  Paul Harvey     9
Because the first INSERT statement specifies the value for the ID column, the DBMS puts a 20 in the ID column of the Bruce Williams row. The second INSERT statement does not include a value for the ID column. As a result, the DBMS adds 10 (the increment) to the highest ID (30) and uses the result (40) as the ID for the new Paul Harvey row.
If you want to guarantee that the IDENTITY column contains a unique value in each row of the table, you must create a unique index based on the IDENTITY column, which you will learn how to do in Tip 161, "Using the CREATE INDEX Statement to Create an Index."
You can use the MS-SQL Server ISNULL() built-in function to return a value other than NULL for columns that are NULL. Suppose, for example, that your EMPLOYEE table has data in columns as shown in Figure 31.1.
EMPLOYEE table
ID
NAME
DATE_HIRED
QUOTA
1
Sally Smith
04/27/00
NULL
2
Wally Wells
04/13/99
5
3
Greg Jones
05/12/97
7
4
Bruce Williams
04/15/00
NULL
5
Paul Harvey
06/05/99
9
Figure 31.1: EMPLOYEE table with sample data and NULL values
If you execute the SQL SELECT statement
SELECT id, name, date_hired, quota FROM employee
MS-SQL Server will display output similar to the following:
 id  name            date_hired         quota
-----------------------------------------------
1   Sally Smith     04/27/00 00:00:00  NULL
2   Wally Wells     04/13/99 00:00:00  5
3   Greg Jones      05/12/97 00:00:00  7
4   Bruce Williams  04/15/00 00:00:00  NULL
5   Paul Harvey     06/05/99 00:00:00  9
If you don't want to explain what a NULL is to your users, you can use the built-in ISNULL() to replace "(null)" in the output with another text string or number.
The syntax of the ISNULL() function is:
ISNULL(expression,value)
Substitute the name of the column that contains NULLs for expression and the character string or number you want displayed in place of "(null)" for value. Therefore, if you want MS-SQL Server to replace "(null)" in the QUOTA column with "In Training," use the SQL statement
SELECT
 id, name, date_hired, 'quota'=ISNULL(quota,'In Training')
FROM
 employee
to have MS-SQL Server output the following for our example data:
 id  name            date_hired         quota
------------------------------------------------
1   Sally Smith     04/27/00 00:00:00  In Training
2   Wally Wells     04/13/99 00:00:00  5
3   Greg Jones      05/12/97 00:00:00  7
4   Bruce Williams  04/15/00 00:00:00  In Training
5   Paul Harvey     06/05/99 00:00:00  9
You can also use the MS-SQL Server ISNULL() function to select either rows where a column is NULL or rows where a column is not NULL. For example, if you want to see the rows in the EMPLOYEE table where the quota is null, you could use an SQL SELECT statement similar to:
 SELECT id, name, date_hired, ISNULL(quota,'In Training')
FROM   employee
WHERE  ISNULL(quota,-999) = -999
If, on the other hand, you want to see only those reps who have a defined quota, replace the = in the WHERE clause with <>, similar to the following:
SELECT id, name, date_hired, quota
FROM   employee
WHERE  ISNULL(quota,-999) <> -999